Contents
Before you start
Tutorial
- Prerequisites
- Getting Started with Balena
- Deploying Code with Docker
- Troubleshooting
- Updates and Device Variables
This post is part two of a two part journey towards working with Raspberry Pi utilizing Balena’s many services for tinkerers wanting to expand their horizons. Part one covered the prerequisites of production level development: setting up a virtual environment, working with the command line, and using GitHub. This tutorial takes the user a step further and introduces production level tools such as Balena and Docker. The idea is to move away from developing locally and into the wider world of continuous development and continuous integration (CI/CD). These skills are often required to work in tech as a developer, but are very difficult to acquire without learning on the job as we would need to simulate a production environment that is separate from our local environment. This is where the Raspberry Pi comes in.
For the hardware hobbyist, this tutorial provides a narrative exploration of Balena, a wonderfully simple way to move from concept to reality by providing a well integrated infrastructure workflow to seamlessly move between code and IoT fleet.
- Raspberry Pi Zero W (can use other Raspberry Pi models as well, for this tutorial the Zero W is used for simplicity)
- Power cable for Raspberry Pi
- MicroSD Card
- This should have a minimum of 4GB and Class 10 speed; the one used here is 64GB but that is not required for this project.
- USB MicroSD Adapter
- Computer
- From Balena Pi Part I:
- WSL (Bash and Ubuntu)
- Python 3 and related packages
- Git
- GitHub
- GitHub repo with script ready for deployment
- Balena Account (free tier)
Tutorial
- Prerequisites
Before getting started, there are a few things from Balena Pi Part I that we need to ensure are ready to go. In the first post, I set up WSL with Ubuntu 18.04 on my computer. From there, I created a virtual environment and wrote a Python script to grab the current weather using an API call to OpenWeather. Before getting started with Balena, I tested this code on my local machine (using Cron to schedule running it). Once I had a functional script, I created a GitHub repository for it and included the script and the requirements.txt file in my repository.
For anyone already comfortable in their local environment not coming from Part I of this post, and working with their own project script, ensure that the script is functional, the requirements.txt is included, and that the GitHub remote repository is up to date.
- Getting Started with Balena
This being my first time using Balena’s services, my first step was to read through their official docs.
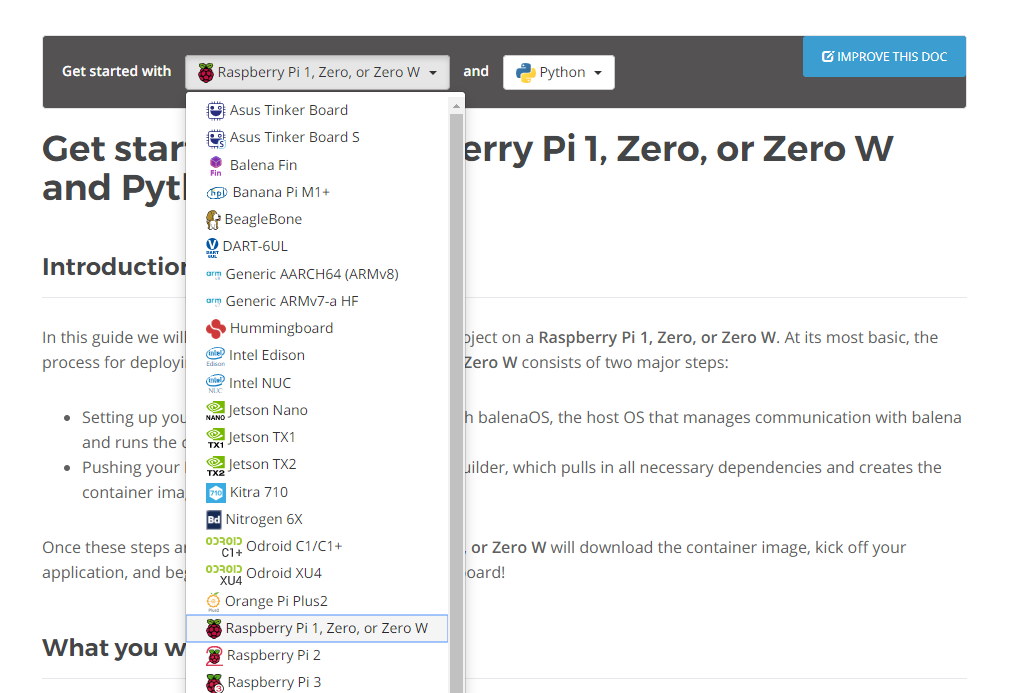
After reading through all of the sections, I was eager to jump on in using the Get Started section but with my own project as opposed to the one suggested and already written up in the docs. The very first step here is to select from drop down fields the device and language. For me, this is a Raspberry Pi Zero W and Python.
- Per the docs, the next step is going to be adding an SSH
key. The easiest way to do this is to generate a new key in GitHub and
then import it to Balena from there. To generate a new key, follow these instructions.
Following that guide, next is adding the new SSH key to GitHub.
Note: As a WSL user it is very important to remember to use the Linux terminal and therefore the instructions for generating the SSH key for a Linux machine. This is especially important to note as it is likely if using a Windows machine that selecting that link will automatically direct to the Windows instructions.

(This note brought to you by a user who started the process with a Windows generated key and then decided to do the entire project with WSL and had to troubleshoot why the SSH key was not working.)
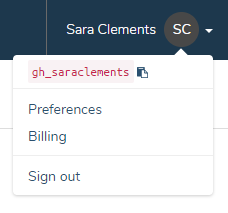
Now the SSH key has been generated and added to the GitHub account, importing it to Balena is easy with the GitHub username. Just follow the prompt during account set up, or if skipped during set up, in the upper righthand corner of Balena’s page, select the drop down on the username and then ‘Preferences’
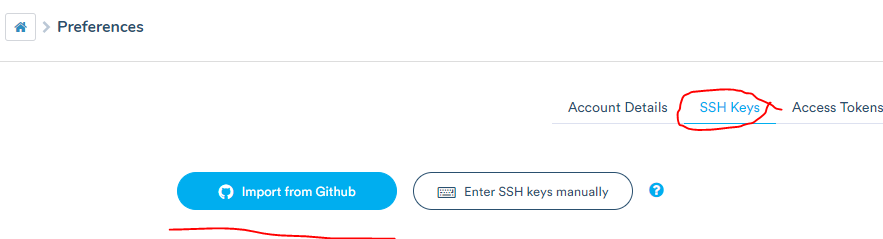
From the Preferences page, select SSH keys from the top menu and then ‘Import from GitHub’ and it will automatically pull keys from GitHub to select from.
- Next step is creating the application. This is very straightforward through Balena’s platform and instruction. Device type for this project is Raspberry Pi Zero, and I used the ‘Starter’ application type.
- For the first device (and for this project, the only device) adding it
first requires working through Balena’s workflow to customize the BalenaOS type
for the device being used. This is one of the huge time saving features Balena
offers in that actually provisioning the device takes next to no time and in my
case no troubleshooting.
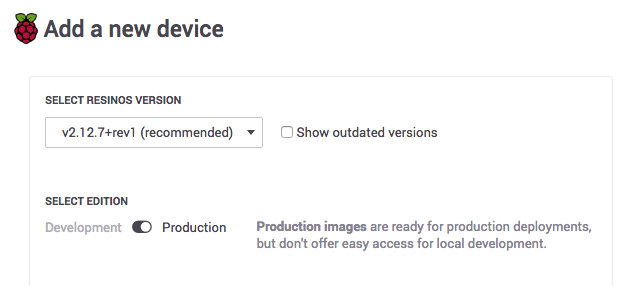
Working through the docs, I added a device and selected the most recent version of the OS, and opted for the ‘Development’ image type. Because I am using the Raspberry Pi Zero W, it is WiFi compatible so I went ahead and entered my WiFi information for ease of accessing the device. If using a Raspberry Pi Zero without the WiFi chip, an ethernet connection will be required.
- After downloading the image, I went ahead to install Etcher. This three
step tool may as well be marketed as a migraine prevention method for tinkerers.
The image is the one downloaded in the previous step, so it was easy to find in
my recently downloaded folder. For the drive, using a USB MicroSD adapter (as my computer does not
have a way to connect a microSD card otherwise) I plugged the card into my
computer. Since I used a 64GB card, I received a prompt to ensure I had selected
the correct drive due to its large size. I triple checked before selecting to
move ahead - definitely do not want to overwrite an existing OS elsewhere, and
sometimes it’s quite nice to have the guardrails there just in case! The
flashing took no time at all, but depending on the card used this can vary.

- Another moment of beautiful simplicity is ejecting the microSD card and popping it into the device. Since I enabled connecting over WiFi, once the Raspberry Pi was equipped with the chip it took only moments for this to appear on my Balena dashboard. The next section of this tutorial is where my project deviates from the docs a bit as I built my own code to run on this device. At this junction however, I have a fully developed script and requirements doc on GitHub, and now a device with a functional OS on it ready to receive some code!
- Per the docs, the next step is going to be adding an SSH
key. The easiest way to do this is to generate a new key in GitHub and
then import it to Balena from there. To generate a new key, follow these instructions.
- Deploying Code with Docker
Still following the Get Started docs (but without cloning the Balena-made web server project, as I already had my own ready to go), I successfully added the Balena remote endpoint to my project. This step is similar to adding any other remote endpoint (such as GitHub). First,
cdinto the project folder - this is the same directory where in part one of this post thegit clonecommand was used. Then use the commandgit remote add balenafollowed by the address of the application repository in Balena, which can be found in the top right corner of the application dashboard: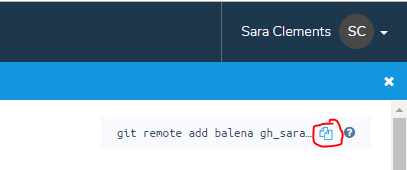
Copy that command and paste it in the command line while working in the project directory in the Ubuntu terminal.
To deploy the code, I went forth with confidence since everything so far had been so super easy. So after using the command
git push balena masterto push my code to Balena, it erred with a message indicating that the Dockerfile was missing. Right, naturally how could the device know how to set up the environment and process the code without instructions? It can’t. Enter Docker.
While Balena really handles most of the heavy lifting here allowing drafting a Dockerfile to be really simple and straightforward, it is worth the time to understand what Docker and a Dockerfile are actually doing. If using this tutorial to understand production level software requirements, then reading the Docker docs and understanding what is being created is invaluable.
For anyone who worked through the first part of this post and has recently become comfortable with creating an environment to work in, then Docker will make a lot of sense in the context of working within a production environment with multiple people. In short, from Docker’s website:
Docker containers wrap up software and its dependencies into a standardized unit for software development that includes everything it needs to run: code, runtime, system tools and libraries. This guarantees that your application will always run the same and makes collaboration as simple as sharing a container image.
For this project, we are building a container that will live in the BalenaOS on the device. While I did follow the Balena template (as shown below), first I did a little research on what I was creating when building a Dockerfile, as well as best practices.
For additional information on Dockerfiles and their integration with Balena, see Balena’s guide to Dockerfiles here.
It’s a lot of reading time, but the payoff is big. These tools enable a much more productive work environment, and are a cornerstone in rounding out an education on career level development.
Balena offers a very straightforward template for building a Dockerfile in the sample project they provide. Ultimately, I followed this basic format for my own, and the similarities are pretty obvious -
Where it differs will be further addressed in the following section.
- Troubleshooting
Once the Dockerfile was pushed to my GitHub repo, I attempted to push the project to Balena with the
git push balena mastercommand again. This time, I received an error in the form of: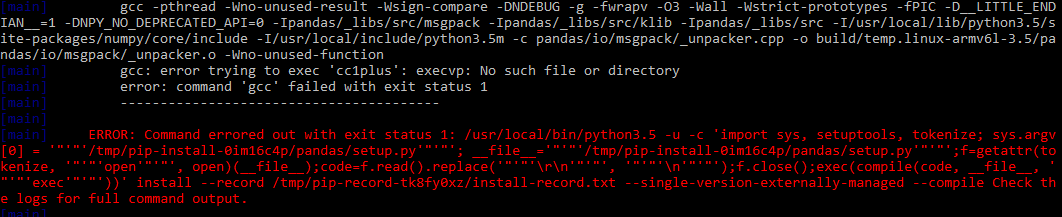
The actual error had not nearly as much information as I generally like, which was a pretty good indication that the error had some connection to C. When looking through the entire log, I came across a section that tried to locate various executables and was ultimately unsuccessful at installing the pandas library required for a function used in my code.
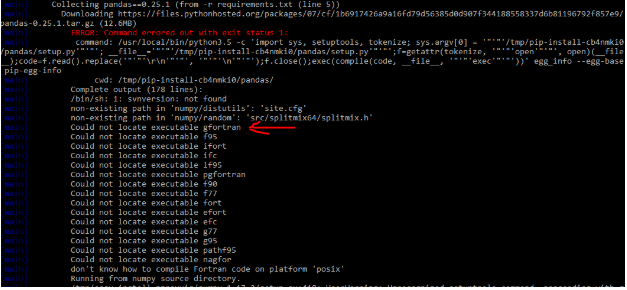
At this point, I had two options. Rewrite my code without leaning on the pandas library (the ‘easy way’) or find the dependencies the NumPy package (what pandas library is built on) utilized that may not be pre-built in this environment, and how to install them (the ‘hard way’). Since I happen to use the pandas library a decent bit for analysis (and enjoy learning about C for fun ), I went for the hard way. To ensure that the pandas library could be installed, first I needed to ensure the packages it is built on top were available. Again, enter Docker.
Here is where the
RUN install_packagescommand comes in handy. Balena has created theinstall_packagesas a way to alleviate the burden of seeking out the specific package managers and commands necessary to run the installation. Huzzah! More details on that here.In the above snippet from the log, it shows an attempt to locate the executable gfortran first, so I started there. Back to the Dockerfile, I added:
    # install dependencies for numpy


    RUN install_packages gfortran
Aside - at this point I pushed to Balena and received an error only to realize scrolling up that the program was using a cached version of the Dockerfile and therefore did not run the install. Upon realization, I cancelled out and write this now with the intention of spreading the message to remember to first add and push with git so the changes are tracked! The cache comes in handy later, though.

After committing, I received a similar error and scrolling up, found the list of executables the program was searching for, which this time around was a C compiler called G++. To prevent further errors, I went for the
build-essentialspackage per suggestion from Lubos Rendek on this useful Linux site, figuring that would cover some additional ground for me.Again, back to my Dockerfile:
    # install dependencies for numpy


    RUN install_packages gfortran


    RUN install_packages build-essential
And again, I am able to use the
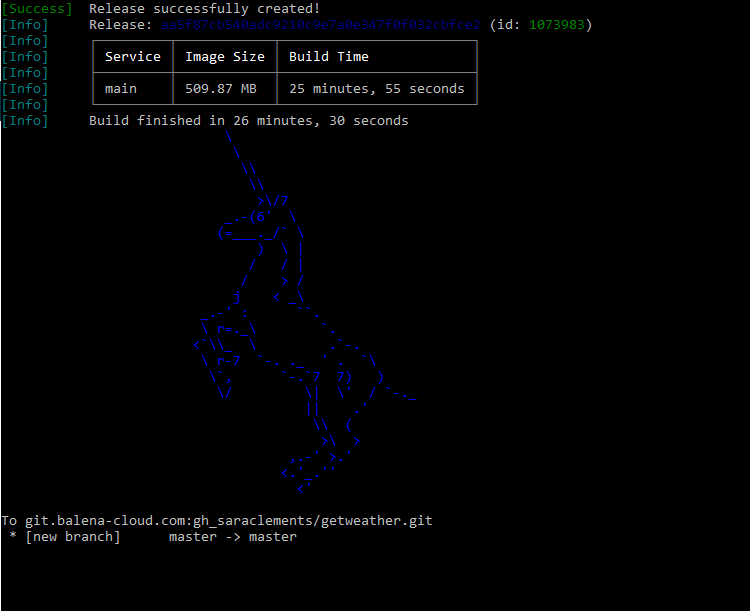
install_packagescommand for consistency, even thoughapt installis ultimately what is being run.Per the above reminder, I pushed my changes and committed them to GitHub as well before running the
git push balena mastercommand again, and finally…Success!
- Updates and Device Variables
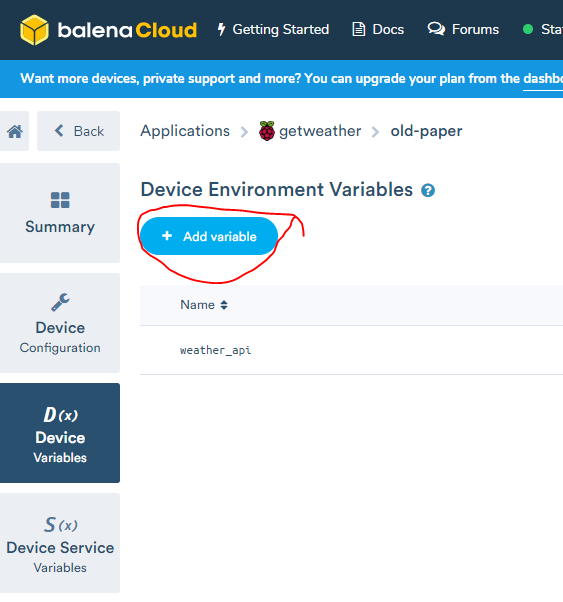
With a successful push, next I went to the Balena dashboard for this device and from there was able to view the logs and even interact with the application via the terminal in the dashboard. Once there I could see from the logs I still required two adjustments. One was to update the file path in my code to store the data in a csv on the device. Once finished, the push to Balena ran very quickly as everything else was already cached and did not need to be rebuilt. The second adjustment was moving the API key to the device. This was refreshingly simple utilizing the Device Variable section of the device dashboard.
As soon as I added what was my environment variable on my local computer as a device variable through Balena’s dashboard, the program restarted and ran. No need to update the code or manually restart. As easy as that, my weather app was collecting and storing data on the Raspberry Pi!
For the hardware hobbyist, this post is a pretty straightforward overview of what Balena has to offer in terms of greatly simplifying the path from idea to code to device, allowing projects to flow smoothly and updates to be done in a cinch.
For those new to software development, what Balena offers is a way to simulate a production level environment and give the user a chance to interact with production level tools without needing to learn on the job.
At this stage, I now have a working app running continually on a small device. From here, building out complexities becomes a breeze as the workflow is structured by Balena. Moving forward with this project, I can begin to build out a database, storing weather data in a table. This database can then be built out with other API calls, or by creating devices that take user input. Different Docker containers can be built to house different dependencies.
This post provides a very basic introduction to a very powerful tool - whatever I decide to do next will further enhance understanding of CI/CD development as I continue to push changes and updates to this project.
The tools/services (and their docs) used in this tutorial include: