Contents
Before you start
Tutorial
- Setting up Ubuntu on WSL
- Quick Intro to Bash on WSL
- Setting up a Virtual Environment
- Simple Python Script
- Environment Variables
- Brief Intro To Git
Conclusion and Resources
Introduction
This post is part one of a two part journey towards working with Raspberry Pi utilizing Balena’s many services for tinkerers wanting to expand their horizons. While this post will be entirely focused on setting up a local environment and putting together a very basic script, the overarching purpose of these two combined posts is to be able to start from having a computer and simple Python coding skills (or really, basic skill in any scripting language) and walk through what it takes to go from “hello world” to deploying a product and the many services involved in doing so. The idea is to bridge the gap for beginner coders to understand the larger context that software development exists in, outside of algorithmic thinking. Part two will cover more of these services. The first step to wrap context around code lies in building your own personal coding environment, and cozying up to command line scripting with Bash! That is what this post will focus on.
Hardware Required
- Computer with Windows 10 OS
Software Required
- Will walk through all necessary tools, accounts, and software beyond Windows 10 including:
- WSL (Bash and Ubuntu)
- Python 3 and related packages
- Git
- GitHub
Tutorial
- Setting up Ubuntu on WSL
As a Windows user, there are many things that can drive one towards seeking out Linux systems. Whether it’s slogging through job applications requiring Bash, or experience automating in Powershell and thinking ‘there HAS to be a better way!’, or scanning forums for troubleshooting and finding answers only for and from Linux users. Eventually, most of us get there. Even Microsoft got there, which is why we can rejoice for now there is the Windows Subsystem for Linux (WSL)!
Installing WSL is pretty straightforward, and I was able to accomplish this largely from just working through the documentation. To understand more about it, and read through Microsoft’s docs and installation process, check out this link.
For my purposes, as somewhat of a newbie here, I opted to install Ubuntu for my foray into Linux. Though Microsoft offers several options, Ubuntu is one of the most popular Linux distributions and therefore I figured I would be more likely to find support when troubleshooting. I mean, why make things harder for myself when learning new tech? Debian would be my second choice, as another popular option.
After completing the steps to install WSL and a corresponding Linux distro, comes time to initialize the new environment and come up with a Linux username as well as a password for when you need to access root level admin privileges (with sudo commands). A tip to save some embarrassment for first timers: when typing a password, nothing will show in the terminal. Trust that it’s there, and also if a typo occurs, delete a whole lot and start fresh. Whether this comes from personal experience or not is unimportant....
- Quick Intro to Bash on WSL
Likely the next thing one may want to do is either create or view items from their local machine. This can easily be done from WSL but may require updating permissions. For my projects, I use my E drive (however many may use C drive). To access the drive, use the bash command for ‘change directory’ as follows:

When accessing the directories on Windows through the Linux terminal, be sure to use /mnt/ as a precursor to the path. The first attempt at this however may yield a permission error. The command ls -l followed by a file or directory will show permissions for the file or directory:
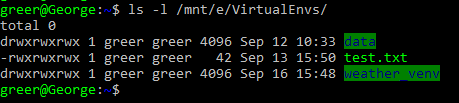
The above column headers could be something like I wrote in sample table below:
|
Column Header:
|
Permissions
|
# of files
|
Owner
|
Group
|
Size
|
Date
|
Name
|
| Sample:
|
drwxrwxrwx
|
1
|
greer
|
greer
|
4096
|
Sep 12 10:33
|
data
|
The leftmost column is actually describing four different instances of permissions, the first letter followed by three sets of three characters.
The first character represents whether the object is a file or directory. The next three represent the owner’s level of permission, followed by group permission, and lastly the final three are all users permissions. In my case I am the only user on my machine, ergo all users (which is really just me) have all permissions. The order is always constant, where the first character is either ‘d’ for a directory or ‘-’ for a file. The three groups are always in the order of ‘read’, ‘write’, ‘execute’ where if there is a ‘r’, ‘w’, or ‘x’ they have the corresponding permission, and if there is a ‘-’ they do not.
For example, an ls -l command that returned the following:
drwxrw-r--
Would indicate this is a directory, the owner has read, write, and execute permissions, their group has permission to read and write but not execute, and any other users only have permission to read from that directory.
Initially, the owner and group listed for this directory was ‘root’. This meant I could only access it as the root user (or using sudo commands to act as the root user). Acting as root should be done in as limited a fashion as possible, *especially* for a newbie working in the terminal as one can seriously wreck a day that way.
Fortunately for me, giving oneself user level access is easy! To change ownership of a directory, just use the chown command. To modify user access, the chmod command will do. In my case, I just changed ownership of my Windows E drive with:

So now that I own it, I can slide right into my E drive with the cd command from above. From here, I can do all sorts of things like:
| Bash Command
|
Action
|
| cd
|
Change directory
|
| ls
|
Show directory contents
|
| mkdir
|
Make new directory
|
| cat
|
Display contents of a file
|
| pwd
|
Print working (current) directory
|
| rmdir
|
Remove directory
|
| rm
|
Remove file
|
| mv
|
Rename file/directory; move file/directory
|
For more Bash commands and details on each, review this Bash scripting guide from Mendel Cooper.
- Setting up a Virtual Environment
To get moving on creating some code, I went ahead and followed this incredibly comprehensive guide for Python users, and recommend reading and working through this.
Creating a virtual environment is a way to install all the packages required for a project, and only those packages, to the location of the project ensuring that everything that is needed is right where it is needed. These isolated Python environments allow for multiple projects that, for example, may require the same package but each one requires a different version of said package. By isolating the projects in separate environments, they each can have their own dependencies. Furthermore, for someone like me, this won’t require *remembering* the specific dependencies when switching between projects - just set up the project environment once, and then each subsequent time working on a project all that is required is activating the environment and I am good to go!
Since Python 3 was already on my machine, I went straight to the virtual environment section. If Python 3 is not already available, or for checking availability, view this section.
While this guide provides an excellent resource, there are two places in which my opinion and therefore my setup differ slightly from the recommendations presented here. In the ‘Pipenv & Virtual Environments’ section, I confirmed I had both Python 3 and pip installed. I installed pipenv but (after creating a bit of spaghetti in my brand spankin’ new environment that ultimately required the generous assistance of a professional environment-cleaning guru) decided the obscurity of it was not worth the extra functionality, and ergo moved on to the ‘Lower level: virtualenv’ section and find that for me it’s valuable for better understanding of the environment with more transparent controls. Perhaps as I expand my experience, I will return to pipenv but for now virtualenvs does everything I need it to.
The second deviation from the tutorial is the way in which I organize my projects and environments. This guide assumes a directory structure of something akin to:

Whereas I consider the following somewhat simpler, where my project folder exists as its own virtual environment, rather than containing the environment inside of a project folder:
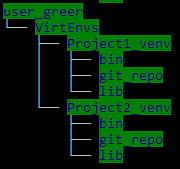
In either of these directory trees, the Python and pip installations will live in the ‘bin’ directory and the installed packages specific to the virtual environment will live in the ‘lib’ directory. The point at which this distinction happens is in the first step of creating the environment, where the guide suggests the following:
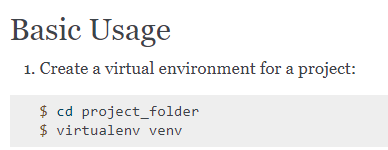
To get my setup this step looks like:
	$ cd VirtEnvs


	$ virtualenv Project1_venv
- Simple Python Script
Finally, with the cleanly laid out directory and virtual environment prepared, it’s time to code!
At this point, if there is a script already written in an outside editor (for example, Notepad++), it can be saved into the project directory and all the package requirements installed via pip install to the virtual environment. If using virtualenv to create environment, be sure to activate it (shown below) before using pip install command to ensure it’s installed to the environment!
Since this tutorial is all about Bash and working within Linux, let’s use a command line editor instead. As a beginner learning loads of new things already, I opted for a very simple, clean, and straightforward option called Nano. I installed this globally (ie. not specific to my virtual environment). For syntax highlighting in Python, I took the following steps:
- Go to home directory

- Look for .nanorc (it may not exist yet)

- Open (or create) file in nano

- Add line to file

- Ctrl + O to write to file, enter to save
- Ctrl + X to exit Nano
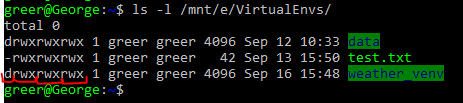
Moving on, it’s time to cd into the project folder (which in my case is also the virtual environment folder). From here, with the following command I enter my virtual environment:

The (weather-venv) indication before my user name allows confirmation that the virtual environment has been activated. Now to start scripting just type the following:

Nano will open a new file, and when written to will save as project_code.py in the current directory. Alternatively, to keep scripts organized in a separate directory:


Since these two posts are focused on setting up a WSL environment and deploying, I will skip over the meat of the simple script created which is just an API call to OpenWeather to grab some current weather details and store them in a csv. The script is available on GitHub.
Because this script includes several package requirements, setting up a requirements file is important as this will later be pushed to the remote repository (in Step 6) and allow other developers to see exactly what needs to be installed to run the script (including the version of the package required). Creating a requirements file is refreshingly simple. The command pip freeze outputs the list of packages as well as the versions. When combined with the Bash command > requirements.txt all of the packages and their versions will be stored in a text file named requirements, which can be used directly by other developers to create an environment matching that which the script was developed in.

- Environment Variables
When considering deploying production code one incredibly important detail is what to do with sensitive information. There will never ever be a situation where it is considered acceptable to have a password or API key in plain text in code, so environment variables are something to get used to. The method I will use here is a simple solution, albeit not the most secure, so depending on the situation at hand it may be worth doing more investigation but for the purposes of getting this code up and running, and keeping my API key safely stored on my local machine, this will do. Stepwise, this will be similar to setting up the preferred syntax highlighting in Nano. Ultimately, this entire post is just describing how to tell our environment to act a certain way, and how to “remember” things for us so we can go forth and create. That said, let us tell our environment to store a sensitive variable for us, in this case, an API key.
To utilize this key in Python code, use the os library for Python which allows interaction with the operating system (which, even though on a Windows machine, is Ubuntu!).
- Open the Python script with nano

- In the Python script, import the os library (along with other libraries needed for the script to execute)

- Use the
os.environ object with the name of the environment variable set in .bashrc to access it.

And that’s it, now as I have set the value equal to api_key in my script, I can just use that variable to access the data I need!
- Brief Intro To Git
The next step is to become familiar with Git. Becoming familiar with these systems is more than just learning a few steps or commands and takes time. In the interest of working through first time development though, there are two resources that serve as really solid jumping off points here.
For a general understanding of Git, why it exists, the problems it solves, and why it is extremely important to know, this write up by Tom Preston Werner gives a great intro level summation.
And for the more step by step user version, I used this post from Gautam Kumar as a guide with a few modifications that, when using WSL, are worthwhile.
There are a few steps in the above tutorial that utilize GUI over command line, and I do not recommend this since WSL means working within two distinct operating systems connected on the same machine. For example, downloading the windows compatible version of git is not going to play nice with the Ubuntu distro. Additionally, the purpose of this entire post is to get comfortable in the command line, and quite frankly, it is almost always simpler to just use the command line.
The other difference from how I did this was I simultaneously worked through a GitHub repo. This is an important difference, because Git and GitHub are *two different tools*. GitHub allows the user to manage a remote repository, however it is possible to use git on a local machine without connecting to GitHub (or any other remote repository service). The steps below will primarily be using git through GitHub’s services, and I will attempt to make it clear which is which.
Additionally, this assumes an existing account with GitHub, which can be created here.
So, the steps as I took them guided by the above:
- Install and set up Git on local machine
 (so easy!)
- Create remote repository on GitHub for current project.
- Per the options, give the repository a name but leave the rest as is (also can include a brief description).
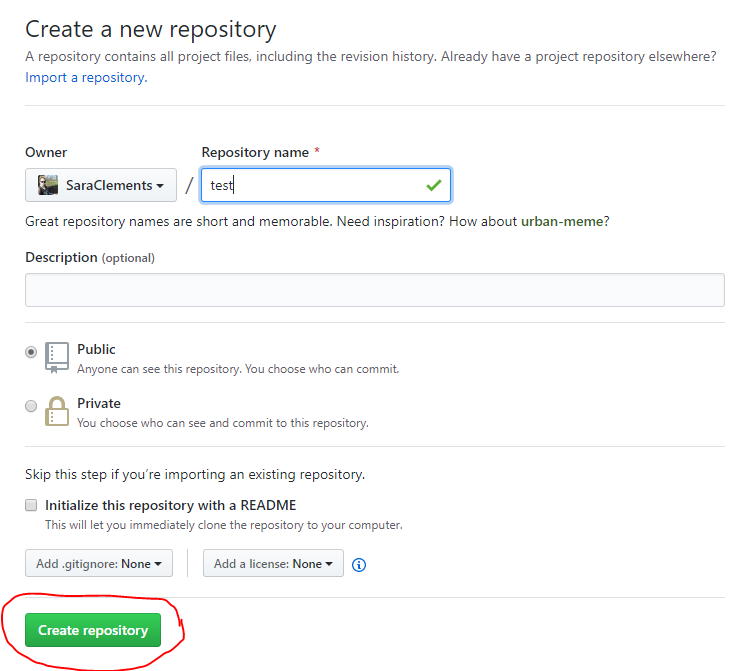
- Now there exists a remote git repository on GitHub that is currently empty and not connected to the local machine.
- Clone empty git repository from GitHub on to local machine
- In the GitHub repository after creation, copy the URL for cloning the empty git repository with HTTPS

- In the WSL command line terminal, change into the project directory

- Use command
git clone followed by the URL copied above

- Once cloned, the project folder now has a new directory with the GitHub repository name -
cd into the new folder.

- Once in the repository directory, the command
ls -a should show a .git directory in the project folder

- Add files to staging and check status
- To add all the files in the project directory, use the command
git add .
- To add only some files in the project directory, use command
git add
- After files (and directories) have been added, use
git status to view
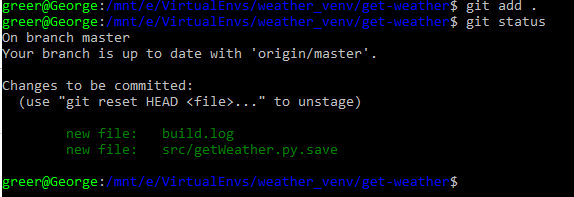
- Note: the
git add command adds new files and updates changed files to the local staging area. The updates have not yet been committed to the local git repository. Consider this a statement of intention to commit these files in the future.
- Commit changes to local git repository
- To commit changes and include a message about the changes (very useful for scanning logs later, or for when sharing work with others), use the command
git commit -am “user message here”

- The above will commit to the local git repository with the message attached to the change. In the above case, “first commit” is the message used for the very first commit of code to the repository. When updating files and committing them thereafter, brief messages about what was changed should go in the quotations.
- Advice: Commit often. When updating or changing a file, commit it after. Much like working in any other file on any other project, more frequent saves will save the user from great headaches later.
- Push changes to GitHub
- To sync the local git repository to the remote GitHub repository, use the command
git push origin master
Part I Conclusion and Resources
At this point, I now have completed a fully operational script, built a functioning virtual environment to execute the script in, and stored the script and its supporting documents both locally and in a remote repository with change logs. Pretty exciting stuff, but now what? Before moving on to part two, read through the documentation on the services and commands used in this tutorial. Being comfortable within the virtual environment, moving around within the Ubuntu terminal, and updating code locally and via GitHub are all extremely valuable skills and as a programmer should become second nature.
So far the tools/services (and their docs) used in this tutorial include:
Part II of this tutorial will dive into even more services and take this simple script from locally operational, through a CI/CD deployment process to a Raspberry Pi. While Part I takes the user through the tools required to develop locally and in tandem with other developers through a remote repository, Part II focuses more on production level coding. The user should be comfortable with creating projects in their virtual environment and pushing to the remote repository before moving on to Part II. Some experience with Raspberry Pi or other single board microcontroller/computer is helpful, but not required.


