Contents
Before you start
Tutorial
Tinkering with electronics can be a really fun way to explore both the hardware and software side of a computer. Most projects for beginners can have you up and running with functioning code very quickly! With this project, I intend to take a simple beginner Arduino kit with basic coding instruction and modify it to create a learning opportunity in C. Specifically, this project focuses on working with arrays in C and provides a brief introduction to memory storage and pointers. The ultimate goal of this project is to learn to pass arrays between functions. We will do this by starting with an array of eight LEDs which we ultimately want to function as a binary counter, running on a loop.
For this project, the components I used all came from a beginners tinker kit from SeeedStudio, pictured below. It comes with all of the below (minus the computer) plus many additional electronic components, along with basic primers on the components to get you up and running with no prior experience! You can find this kit here: SeeedStudio Starter Kit for Arduino

- Arduino Board: In this tutorial I am using the Arduino Uno Rev3 and highly recommend it (as does Arduino) for the beginner tinkerer as it is a robust little board with a lot of documentation. However, another Arduino board should work just fine as this is a very simple program (as long as it has at least 8 I/O pins for connecting the LEDs!).
- Breadboard: This is to create your circuit, no soldering needed!
- 8 LEDs: Color of your choice!
- 8 560 Ohm Resistors: New to working with resistors? These should have bands of the following color scheme - Green-Blue-Brown.
- Wire: Total of 10 wires, 8 for the LEDs, 1 for the voltage connection and 1 for the ground connection.
- Computer: This is where you will script your code and can act as the power supply for the Arduino.
- Cable: To connect your Arduino to the computer you are using, you will need a USB A to USB 2.0 type B. If you are using a different Arduino board than that one used here, always double check your connections!
- Arduino IDE: This is available for download on Windows, Mac OS, and Linux. While this tutorial was created on a Windows machine (hard mode!), Mac and Linux are generally preferred and will have more documentation when it comes down to troubleshooting. However, for simple circuits like this project any OS should be just fine. You can download (or try the web based version) here: https://www.arduino.cc/en/main/software
Tutorial
- Setting up the Breadboard Circuit
The very first step is to connect the hardware elements we will be working with. This is a very simple circuit design, but requires one very important caveat: LEDs are diodes which means they are directional! When connecting the elements, the resistors can be inserted in either direction, but the LEDs will only work when inserted in the correct direction.
Below is the layout of the breadboard (source: http://ardx.org/src/circ/CIRC02-sheet-OOML.pdf). You can see in the below image, the positive end of the LED is going to have a longer lead. Ensure all of these are facing the correct direction, and that the resistors are connected along the same line on the breadboard to the negative side (shorter lead) of the LED.
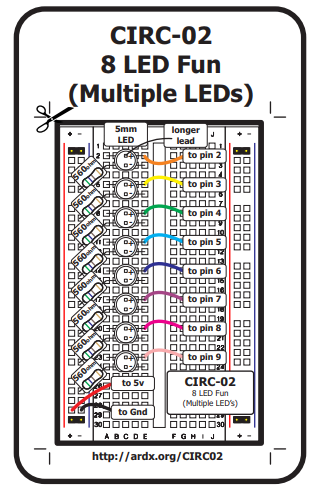
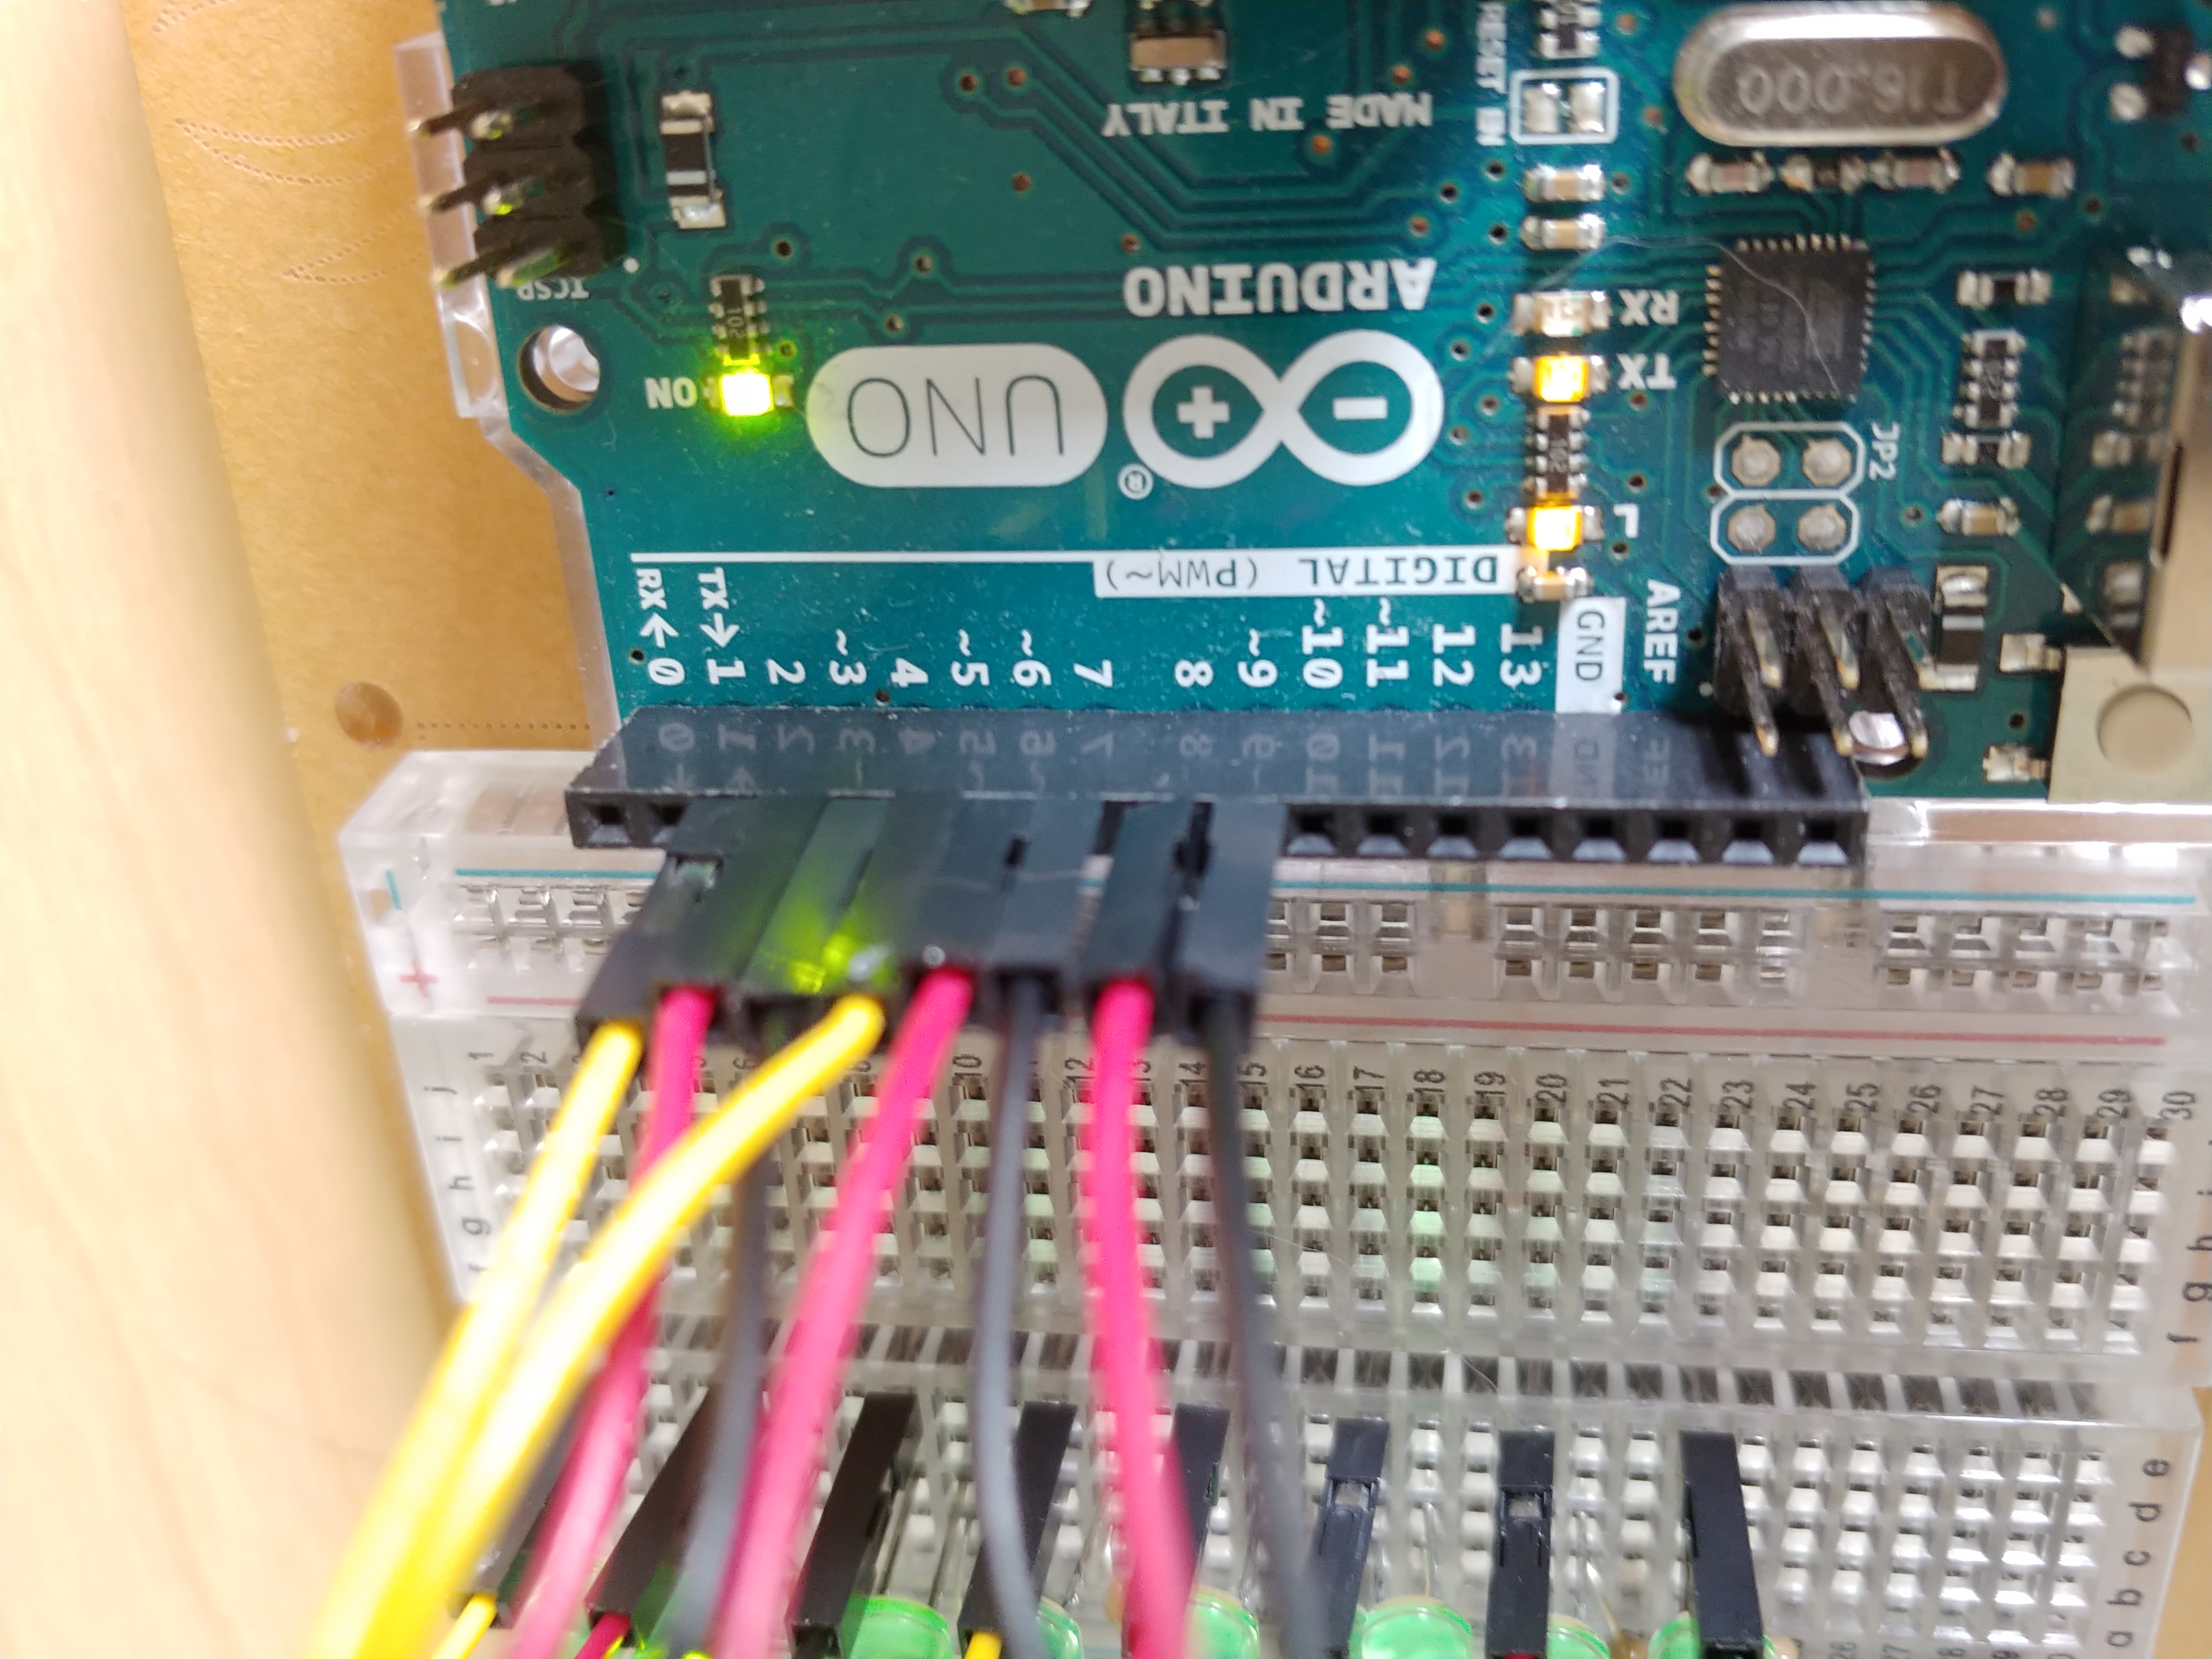
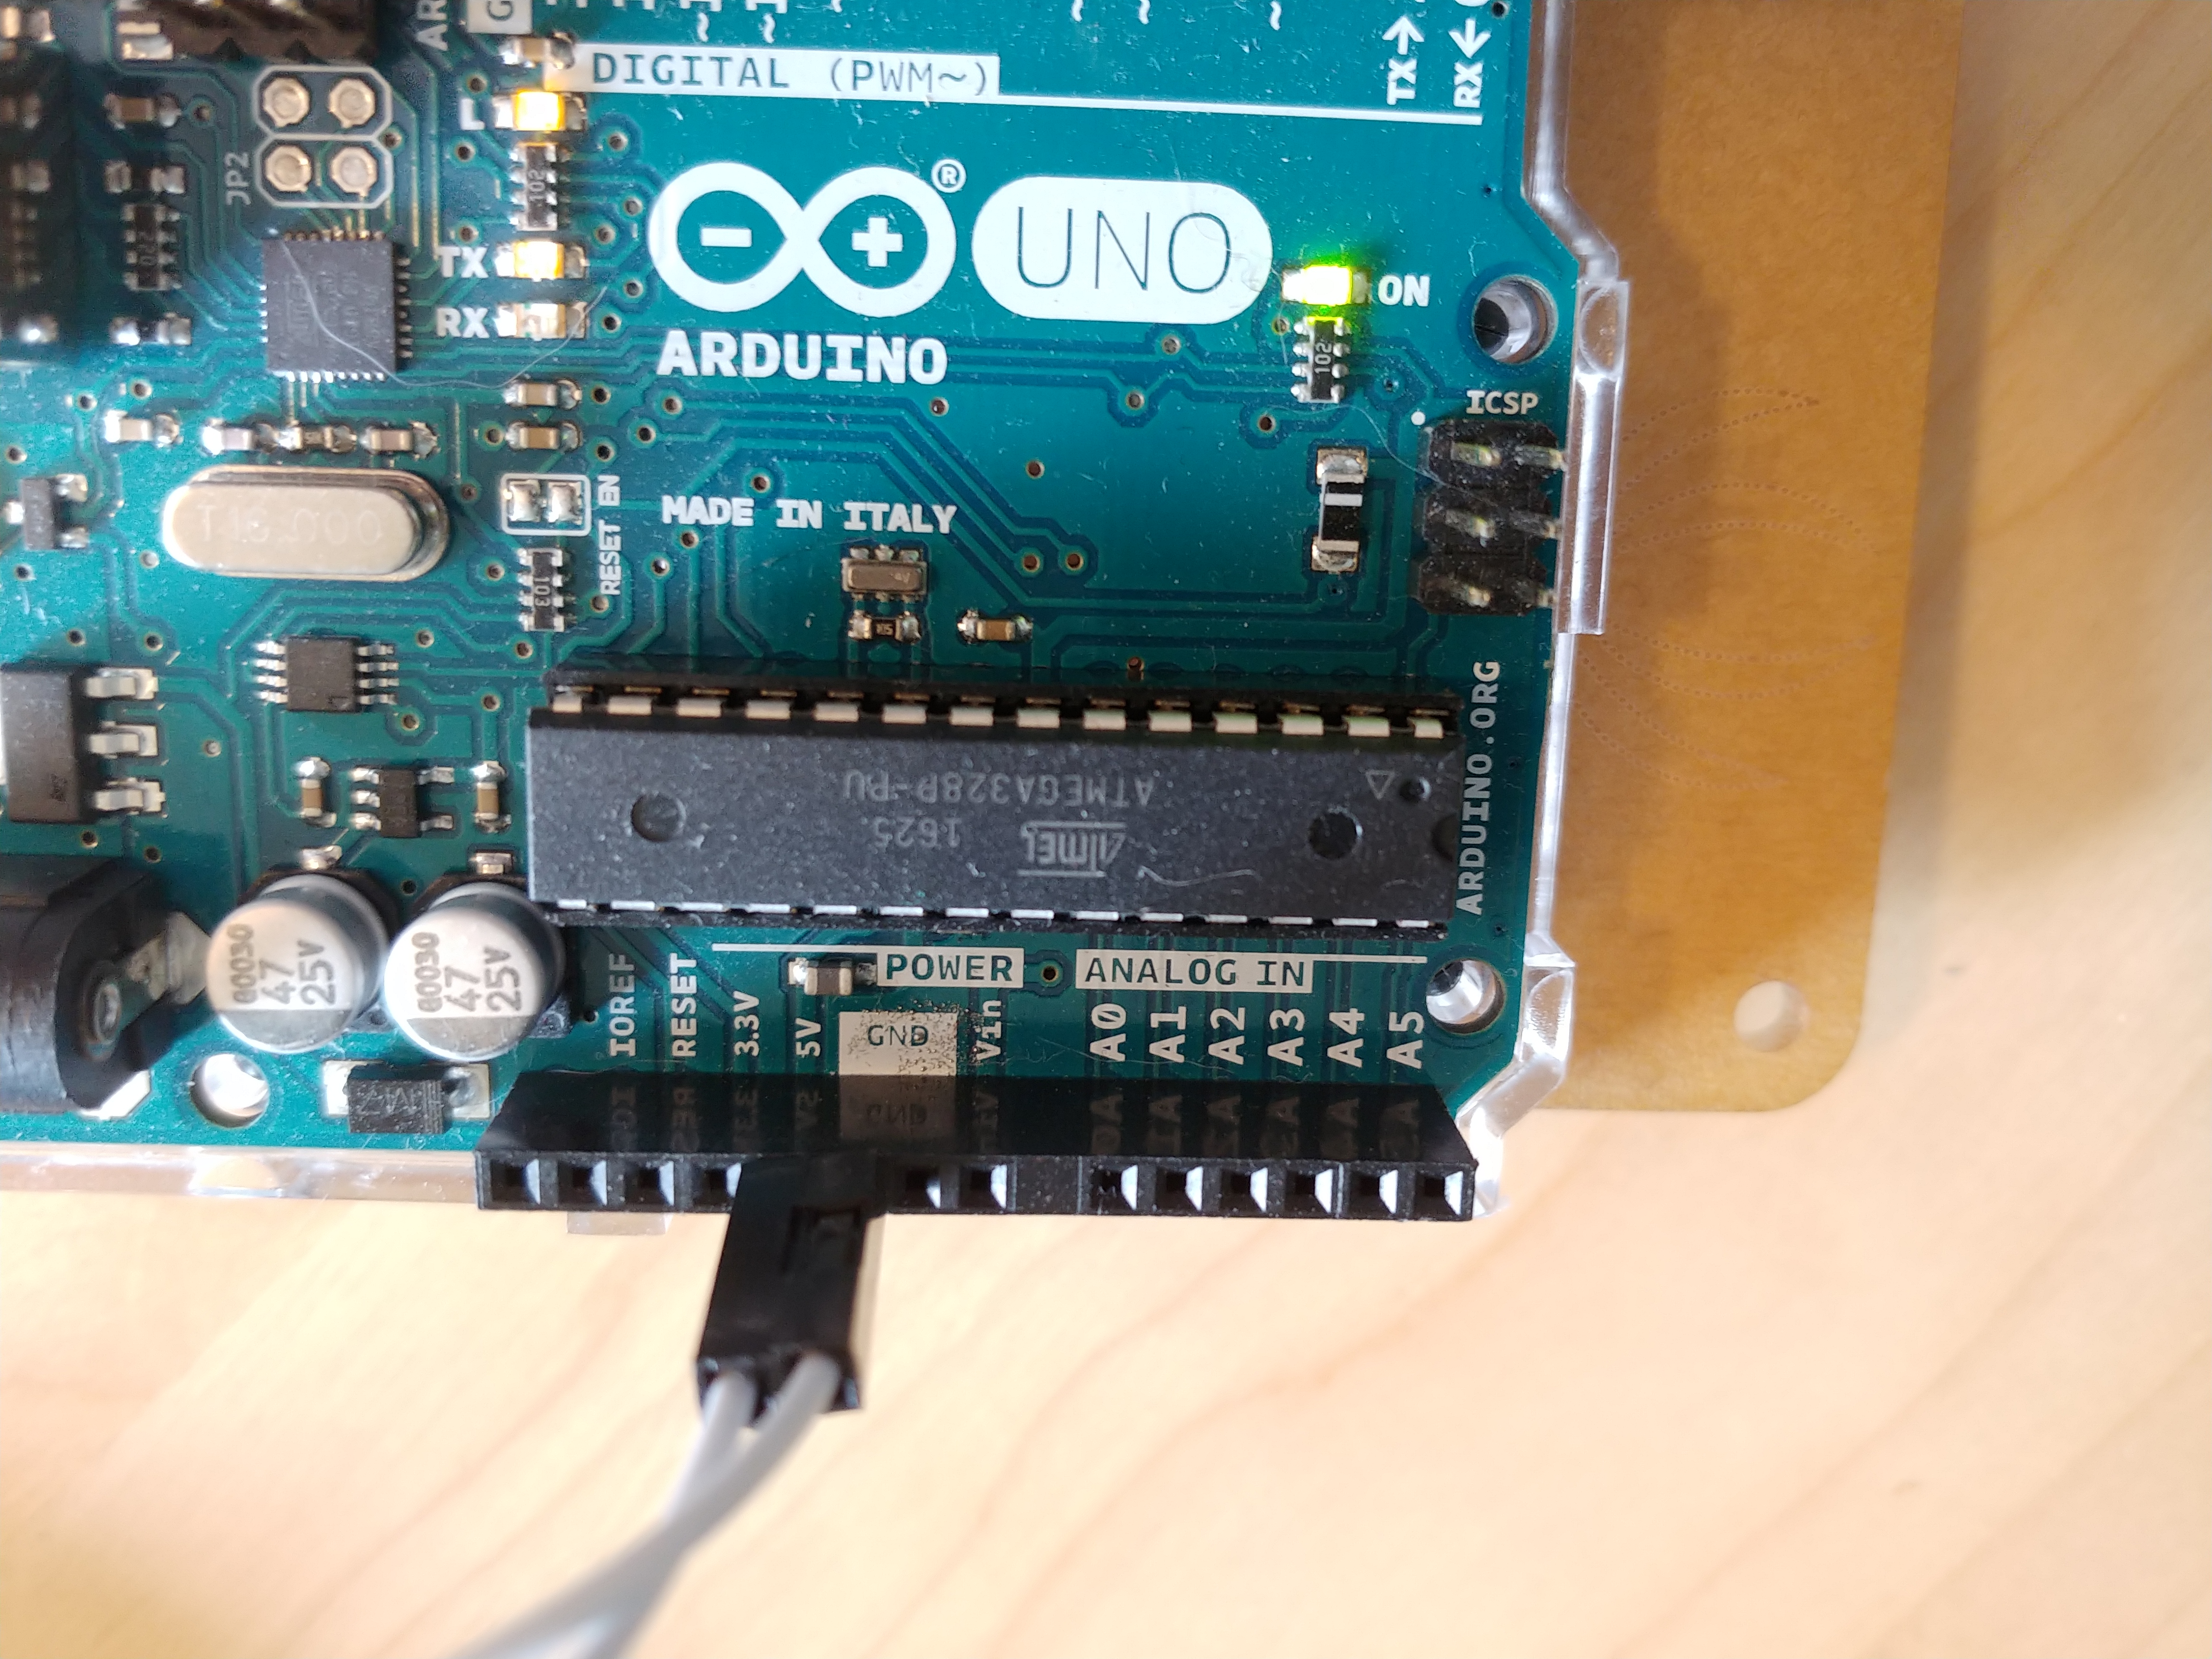
The pins, ground (Gnd), and 5V connections will be connected to your Arduino board, where they are conveniently labeled and can be seen in the images below:
It is useful to also be familiar with the schematic of the circuit that you are creating. While the breadboard to Arduino connections are very visible in a simplistic set up such as this, as the circuits become more complex these diagrams will prove very useful. The schematic is as shown below (source: http://www.oomlout.com/oom.php/products/ardx/circ-02):
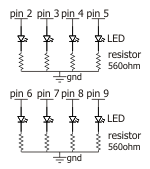
Quite simple indeed!
- Testing the Circuit
To test the circuit, it’s important to ensure all the LEDs, resistors, ground, and voltage connections are correctly set up. Now that the breadboard is wired up, it’s time to connect the Arduino board to the computer and open up the IDE for the first sketch!
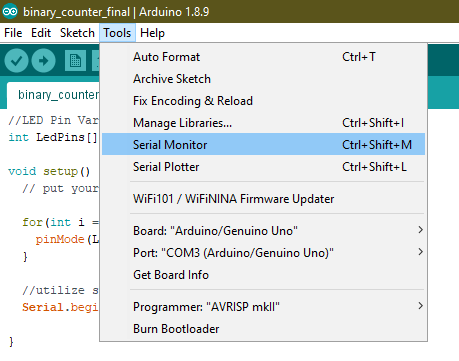
With the Arduino plugged into one of the computer’s USB ports and the Arduino IDE open, it’s time to ensure the IDE is communication with the correct USB port. Do this from the main toolbar on the IDE, go to:
Tools → Port
This should show the port (in my case, COM3) and the Arduino board.
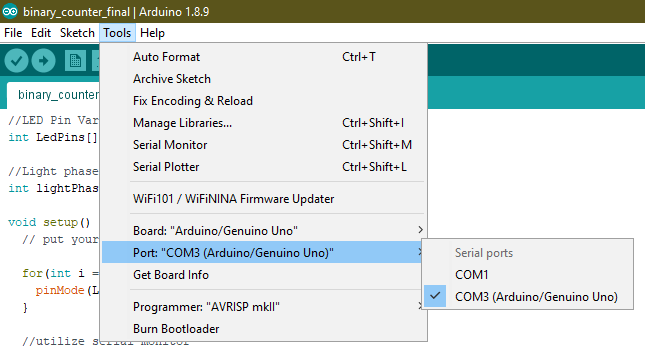
It may also be worthwhile to ensure the board listed above the port is correct.
Once the IDE is set up, the following is a simple script to turn on the LEDs to ensure everything is as expected.
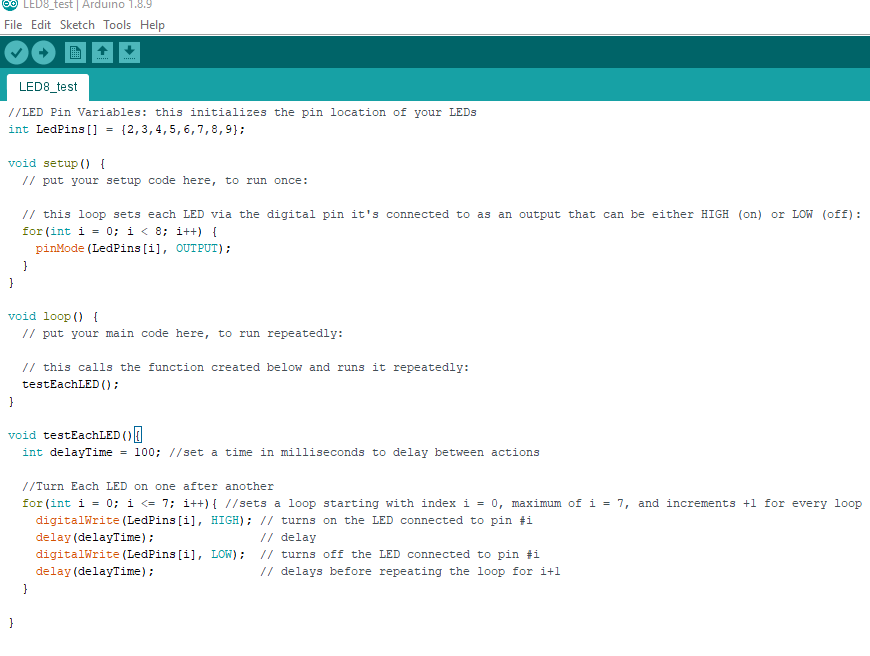
Since I am of a mind that when learning, one should never copy and paste but rather write each line out to better commit these ideas to memory, I will leave this as a screenshot and put the user through the extra work here.
Use the check mark to compile the code, and the right-facing arrow to upload it to the Arduino.
When compiling, if there are any errors with the script the error will be shown at the base of the screen. Usually at this point, it will be grammatical. Check that names are consistent (case matters!), that all lines end with a semicolon, and that all open parentheses have matching closed parentheses. This is debugging 101 and will remain relevant forever.
When uploading, errors with the connections will be found out at this point. If some of the LEDs are lighting up and others are not, this is almost certainly an indication that the nonfunctioning LEDs have been inserted in the wrong direction. Easy fix - just cut the connection and flip them around! If none of the LEDs are blinking, then it is worthwhile to revisit the script while checking the connections.
Some troubleshooting questions to ask:
- Do the numbers in the array LedPins in the top line of the code match the pin connections the LEDs are connected to?
- Are all LEDs facing the wrong direction?
- Are the resistors connected to both the correct (negative) side of the LEDs, and the correct (negative/ground) side of the bus line?
The result should look something like this:
- Scripting a Binary Counter
At this point, we now have a few items in our scripting toolkit from our test:
- Void setup(): This is at the beginning of the sketch, and only runs once. It is used to set up initial code - such as setting the pinMode to output for each of the LED pins.
- Void loop(): This is where the meat of your sketch is run, and it will run repeatedly. This function is used to control the Arduino board.
- for() loop: A handy device in any coding language, the for loop allows for iterating over an index value.
- Setting up an array: This is where the LedPins was set in the test code; the structure of which is simple enough and will be covered later as we set up empty arrays to be filled and passed on to other functions.
- Setting up a variable: This is where the delayTime was set. Structurally simple, the key thing to remember in C is when initializing a variable, the data type (int, float, char etc.) must be assigned.
- pinMode(): This sets the pin (which the LED is connected to) to be either input or output. When using LEDs, the goal is for the lights to function as an output.
- digitalWrite(): This function sets the output of a pin to on or off (using HIGH and LOW).
- delay(): Sets a pause in the program, time in milliseconds.
The Arduino reference page includes more detailed descriptions of each of these functions and more: https://www.arduino.cc/reference/en/#page-title
To create the binary counter only requires the use of the above ideas in addition to a few more:
- if()
- int*
- *p
- malloc()
- free()
With the exception of the if() statement, the new concepts that will be applied for this project are all related to pointers.
So let’s start with a brief primer on pointers.
A pointer in C is a variable that stores (or ‘points to’) the address of another variable. The address we are referring to here being the actual disk space where the value of the second variable lives. A pointer is like a business card - it gives the location to find the person/place/thing being sought out but does not contain the person/place/thing itself.
To set up a pointer is to let the program know you are creating a variable meant to find and store the location of another. This is where the *p notation comes in. Naming a pointer ‘p’ is not required as will be shown in this project. The great thing about pointers is the user is not required to find that location, it is done automatically! Of course, this is also a double edged sword where I advise using caution. When working with moving parts in a script, bear in mind that variables in your code may actually *move* to a different storage location. So when working with loops and moving parts it is important to remember to utilize the free() function to reallocate the pointer (thereby ‘freeing’ it from it’s current address - like wiping the business card clean to be reprinted).
The importance of the pointer for this project is due to the use of multiple functions where an array is to be created in one and passed to another. To pass an array in C cannot be done without the use of pointers. Therefore, a pointer will be initialized in the function where the array is created, and then called in the function where it acts on the LED pins.
Next step is to create a plan of execution.
There are many potential ways to plan this out and script it such that the end result is 8 LEDs counting on a loop in binary. For the purpose of this project, three functions were utilized. The outline devised involves the following functions:
- A function to count from 0 to 255. With the use of the for() function to iterate (thereby count for us), this is a rather simple step. The end point of 255 is simply determined given that each LED accounts for one bit, and there are 8 LEDs to work with. 8 bits allows the user to count up to 255.
- A function to convert base ten integer to a binary array. This takes the base ten value from function 1 and converts it to a binary number using an 8 bit array to store the value.
- A function to output the binary array to the LEDs such that the lights display a binary number (using ‘on’ for 1 and ‘off’ for 0). This translates the array of ones and zeros to a pattern of on and off lights to represent the binary value.
Since 1 and 3 are simple steps that will pull values from 2, where the bulk of the work is happening, scripting out the second function first will prove most valuable.
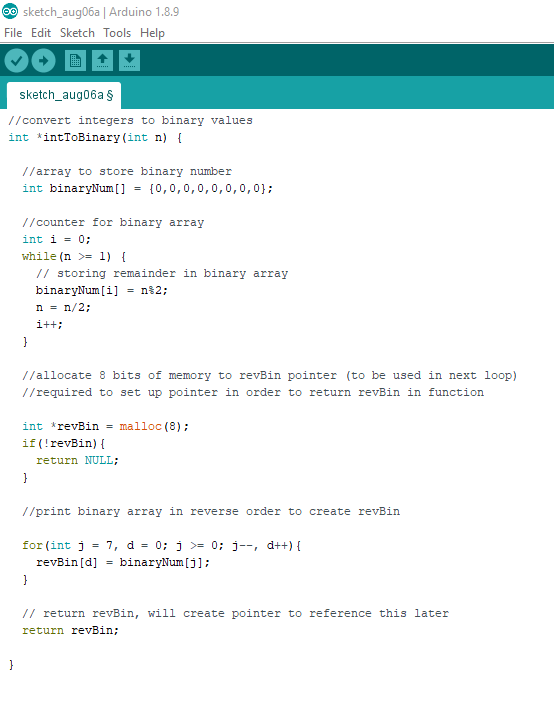
Function 2: intToBinary()
The goal of this function is to take an integer value from 0 to 255 as input (input will be automatically generated when we get to function 1) and convert this to an array of 1s and 0s that represent the binary value.
For example, an input of 13 should yield an array {0,0,0,0,1,1,0,1} as the binary equivalent of 13 is 0000 1101.
To create this involves some fun with math!
The two operators of key importance to do this are modulo (%) for finding remainders, and division (/) by two. Programming aside, a quick way to find the binary equivalent of an integer is with quotient and remainder dividing by 2. For consistency, 13 will be the example. The goal is to store the remainder, while utilizing the quotient to move to the next step in the process until the quotient is below 1.
Division Quotient Remainder 13 / 2 = 6 1 6 / 2 = 3 0 3 / 2 = 1 1 1 / 2 = 0 1 The final step once a quotient of 0 is reached (with or without a remainder value) is to reverse the stored remainders, which gives 1101, and add an additional four bits to the beginning to represent the full 8 bit value, 0000 1101, and what’s left is the binary result for 13!
Now to translate this to C…
When viewing and copying the below code it is important to note the pointer notation used here. It is not possible to return an array from a function in C. Note the function itself uses the pointer notation to allow for referring to the location of this function at a later point. Additionally, when setting up the array revBin, the malloc() function is used to assign 8 bits to the array as we know this will ultimately yield an 8 bit array result.
The if() function after initializing the revBin pointer is there to ensure that 8 bits of consecutive memory storage is available. If it is not, an error message can be utilized (return 1) to indicate the space was unavailable. In this case, return NULL is used as 8 bits is a small enough storage unit to not worry too much about error returns.
Next up will be function 3, as this is the function that inToBinary will be passed to.
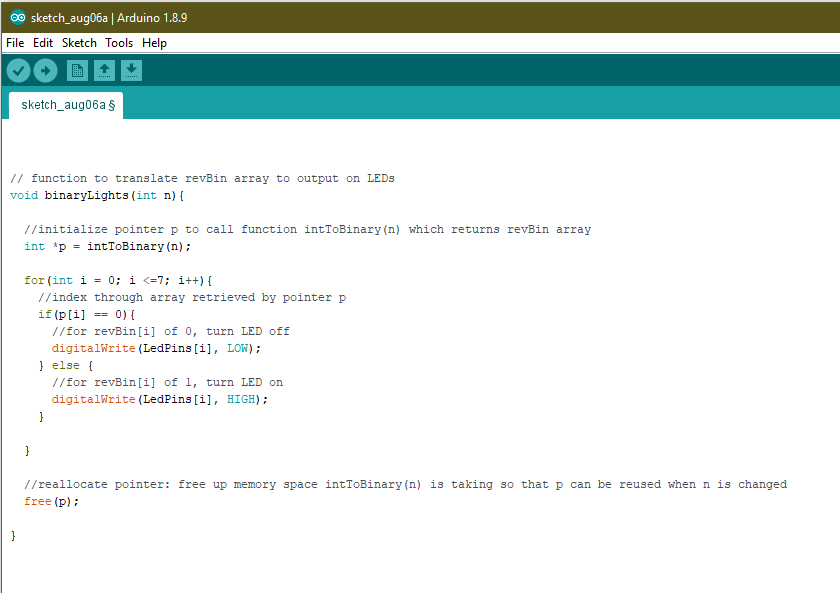
Function 3: binaryLights()
The goal of this function is to output the array built above in the intToBinary function to the light display. The meat of this function is straightforward and utilizes similar logic as the test script from earlier. The two new ideas represented here are initializing a pointer (*p) to call the inToBinary function with some integer n and utilizing the if() statement to set the light output to on or off based on the array of ones and zeros. The int i is used to index through both the array of LEDs and match it to the binary number array (revBin).
Now that the ability to translate integers to binary and to pass the binary output to our light display exists, all that is left is to create a loop that counts integers from 0 to 255 and calls for the translation to a lighted display.
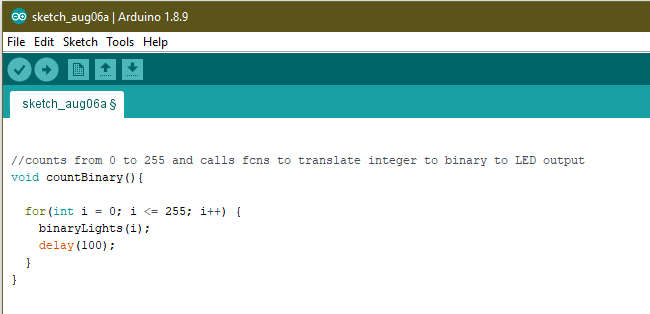
Function 1: countBinary()
To construct this function, all it calls for is a simple for loop. The for loop will call the binaryLights() function which in turn calls the intToBinary() function and inserts an integer value into the function parameter. A delay is added to ensure that the user can adequately view the binary light configuration before it moves on to the next number.
Now that the three functions are set up, the last step is to pull the script together with void setup() and void loop() functions to run it.
Once pulled together, the code should look something like this:
		//LED Pin Variables
		int LedPins[] = {2,3,4,5,6,7,8,9};

		void setup() {
		  // put your setup code here, to run once:

		  for(int i = 0; i < 8; i++) {
			pinMode(LedPins[i], OUTPUT);
		  }
		}

		void loop() {

		  countBinary();

		}

		//convert integers to binary values
		int *intToBinary(int n) {

		  //array to store binary number
		  int binaryNum[] = {0,0,0,0,0,0,0,0};

		  //counter for binary array
		  int i = 0;
		  while(n >= 1) {
			// storing remainder in binary array
			binaryNum[i] = n%2;
			n = n/2;
			i++;
		  }

		  //allocate 8 bits of memory to revBin pointer (to be used in next loop)
		  //required to set up pointer in order to return revBin in function

		  int *revBin = malloc(8);
		  if(!revBin){
			return NULL;
		  }

		  //print binary array in reverse order to create revBin

		  for(int j = 7, d = 0; j >= 0; j--, d++){
			revBin[d] = binaryNum[j];
		  }

		  // return revBin, will create pointer to reference this later
		  return revBin;
		}

		// function to translate revBin array to output on LEDs
		void binaryLights(int n){

		  //call array revBin using pointer (runs fcn and sets pointer to array return value whose address has already been stored)
		  int *p = intToBinary(n);

		  for(int i = 0; i <=7; i++){
			if(p[i] == 0){
			  digitalWrite(LedPins[i], LOW);
			} else {
			  digitalWrite(LedPins[i], HIGH);
			}
		  }

		  //reallocate pointer
		  free(p);
		}

		//counts from 0 to 255 and calls fcns to translate integer to binary to LED output
		void countBinary(){

		  for(int i = 0; i <= 255; i++) {
			binaryLights(i);
			delay(100);
		  }
		}
And the output should look like this:
Troubleshooting this project can be done in several ways. For the purpose of this post, I will stick with the super simple method I used. The Arduino sketch has a feature under Tools called the Serial Monitor. This allows the user to output results to a monitor. This script uses the Serial.print() feature to print out certain snippets of code and ensure the code is running as expected and producing results.
To utilize the print option, just add Serial.begin(9600) to void Setup() function.

A sample of code where I used this to debug is shown below:
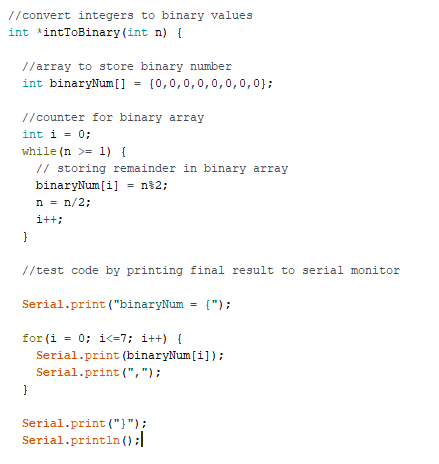
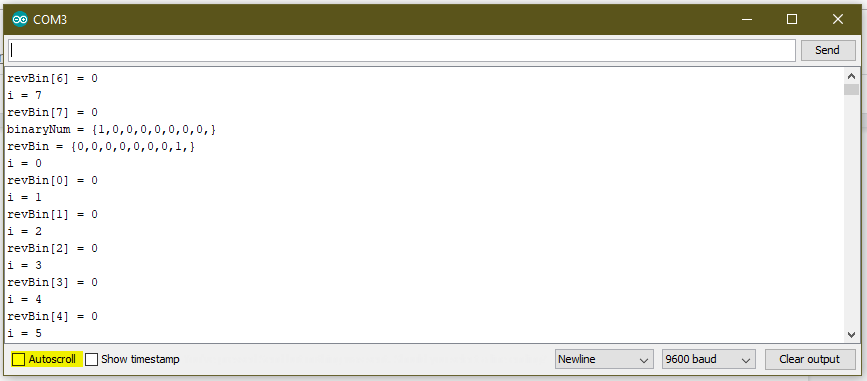
When run with the Serial Monitor open, a sample result of the output is:
binaryNum = {1,0,0,0,0,0,0,0,}
Since the code loops, there will be an output for each integer (256 total). The print statements can be used at any point in the code to check if the output is what was intended or if something unexpected is happening. Utilizing these print functions throughout my code was how I was able to find where issues were popping up, items failing, and also serves as a great way to test knowledge on pointers and how they work!
Worth noting, if printing to the serial monitor, it may be useful to add delay times between loops/statements or to uncheck the auto scroll option (shown below) so as to better view the output.
All said and done, my final code with serial monitor statements included was as follows:
		//LED Pin Variables
		int LedPins[] = {2,3,4,5,6,7,8,9};

		void setup() {
		  // put your setup code here, to run once:

		  for(int i = 0; i < 8; i++) {
			pinMode(LedPins[i], OUTPUT);
		  }

		  //utilize serial monitor
		  Serial.begin(9600);
		}

		void loop() {

		  countBinary();
		}

		//convert integers to binary values
		int *intToBinary(int n) {

		  //array to store binary number
		  int binaryNum[] = {0,0,0,0,0,0,0,0};

		  //counter for binary array
		  int i = 0;
		  while(n >= 1) {
			// storing remainder in binary array
			binaryNum[i] = n%2;
			n = n/2;
			i++;
		  }

		  //test code by printing final result to serial monitor

		  Serial.print("binaryNum = {");

		  for(i = 0; i<=7; i++) {
			Serial.print(binaryNum[i]);
			Serial.print(",");
		  }

		  Serial.print("}");
		  Serial.println();

		  //allocate 8 bits of memory to revBin pointer (to be used in next loop)
		  //required to set up pointer in order to return revBin in function

		  int *revBin = malloc(8);
		  if(!revBin){
			return NULL;
		  }

		  //print binary array in reverse order to create revBin

		  for(int j = 7, d = 0; j >= 0; j--, d++){
			revBin[d] = binaryNum[j];
		  }

		  //test code by printing final result to serial monitor

		  Serial.print("revBin = {");

		  for(i = 0; i<=7; i++) {
			Serial.print(revBin[i]);
			Serial.print(",");
		  }

		  Serial.print("}");
		  Serial.println();

		  // return revBin, will create pointer to reference this later
		  return revBin;
		}

		// function to translate revBin array to output on LEDs
		void binaryLights(int n){

		  //call array revBin using pointer (runs fcn and sets pointer to array return value whose address has already been stored)
		  int *p = intToBinary(n);

		  for(int i = 0; i <=7; i++){
			if(p[i] == 0){
			  digitalWrite(LedPins[i], LOW);
			} else {
			  digitalWrite(LedPins[i], HIGH);
			}
			// test efficacy of pointer via serial monitor
			Serial.print("i = ");
			Serial.print(i);
			Serial.println();
			Serial.print("revBin[");
			Serial.print(i);
			Serial.print("] = ");
			Serial.print(p[i]);
			Serial.println();
		  }

		  //reallocate pointer
		  free(p);
		}

		//counts from 0 to 255 and calls fcns to translate integer to binary to LED output
		void countBinary(){

		  for(int i = 0; i <= 255; i++) {
			binaryLights(i);
			delay(100);
		  }
		}